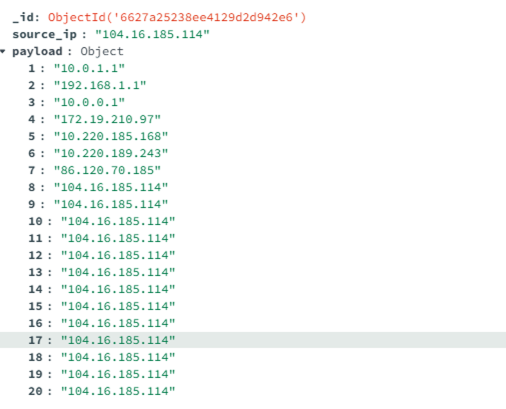
I queried, some time ago, trace route info for IP’s in a list and took the wrong decision to save it in the following form.
At first sight it’s not really an issue but if you want to retrieve it and create a dataframe it will look not as expected.
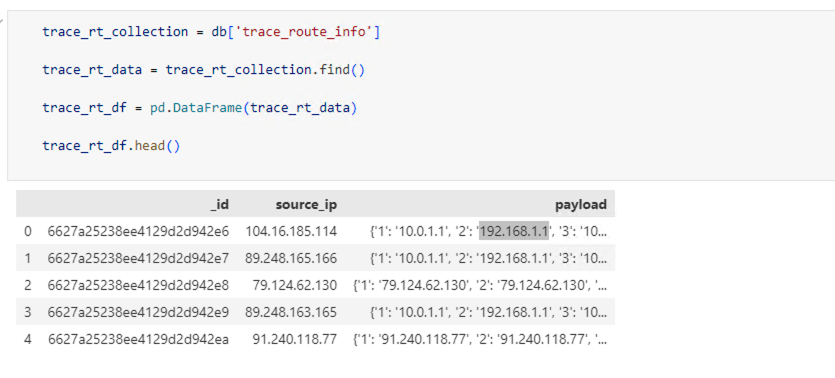
Here is the actual code to separate the payload column to column defined by keys in dictionary
import pandas as pd

# Assuming 'df' is your DataFrame and 'payload' is the column containing dictionaries
df_expanded = pd.json_normalize(trace_rt_df['payload'])

# Rename columns to match original keys (optional)
df_expanded.columns = df_expanded.columns.map(lambda x: x.split('.')[-1])

# Concatenate the expanded columns with the original DataFrame
df_final = pd.concat([trace_rt_df, df_expanded], axis=1)

# Drop the original 'payload' column (optional)
df_final.drop('payload', axis=1, inplace=True)
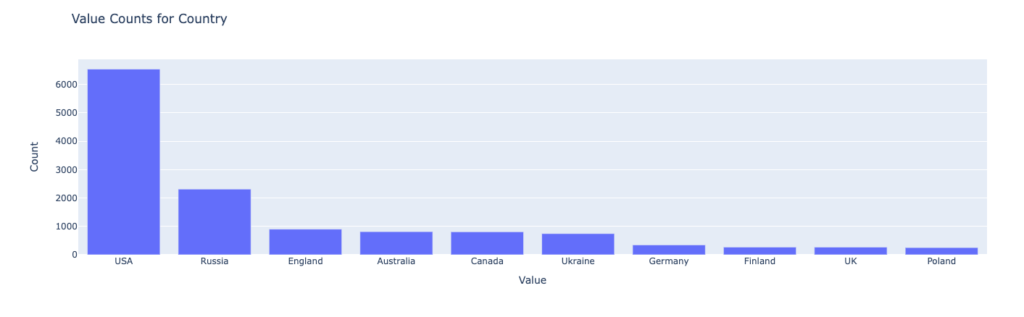
To make a long story short, if you want to plot the count for each individual column and capture the unique values of a particular column inside that dataframe, you can simply achieve it by using the following command:
We will select the first 10 countries in the series since the actual number of unique countries in the dataset is actually 118.
And the plot looks like this.
I wanted to document it because it’s an operation that I have done before, and the actual feedback from the chatbot when asked what is the solution was quite a bit more complex.
First of all it consisted of the code to filter the values and save the definition of the bar plot to a JSON file, using vega-altair library (subject for exploration at one moment in time – https://altair-viz.github.io/) and parsing the data to create the plot.
The first part worked without any issues, with the following piece of code:
import altair as alt
import pandas as pd

# Assuming df is your DataFrame (from the previous example)

# 1. Filter to column 'Country' and calculate unique value counts
value_counts = mycategory['Country'].value_counts()

# 2. Convert to DataFrame for plotting
value_counts_df = pd.DataFrame({'Value': value_counts.index, 'Count': value_counts.values})

# 3. Create bar plot
chart = alt.Chart(value_counts_df).mark_bar().encode(
    x=alt.X('Value:N', axis=alt.Axis(title='Value')),
    y=alt.Y('Count:Q', axis=alt.Axis(title='Count')),
    tooltip=['Value', 'Count']
).properties(
    title='Value Counts for Column Country'
)

# Save the chart
chart.save('value_counts_column_a_bar_chart.json')
But the second part was a little bit tricky since the chatbot didn’t have a read idea of how the structure of the file was formed, suggesting:
import plotly.graph_objects as go
import json

# Load JSON data
with open('value_counts_column_a_bar_chart.json', 'r') as f:
    chart_data = json.load(f)

# Extract data for plotting correctly, handling both nominal and quantitative data
if 'Column Name' in chart_data['datasets'][0]['data'][0]:
    # Nominal data (e.g., categories like 'A', 'B', 'C')
    x = [d['Column Name'] for d in chart_data['datasets'][0]['data']]
    y = [d['Unique Value Count'] for d in chart_data['datasets'][0]['data']]
else:
    # Quantitative data (e.g., numeric values)
    x = [d['Value'] for d in chart_data['datasets'][0]['data']]
    y = [d['Count'] for d in chart_data['datasets'][0]['data']]

# Create Plotly bar chart
fig = go.Figure([go.Bar(x=x, y=y)])

# Customize layout (optional)
fig.update_layout(
    title='Value Counts for Column A',
    xaxis_title='Value',
    yaxis_title='Count'
)

# Show the chart
fig.show()
If you try to compile that it will return a KeyError:0 which is cause by the index of the chart_data[datasets][0] which is not correct.
Taking a look in the actual JSON structure you quickly find that the right key is data-85d48ef46f547bd16ab0f88b32c209fb, which bring us to the correct version:
import plotly.graph_objects as go
import json

# Load JSON data
with open('value_counts_column_a_bar_chart.json', 'r') as f:
    chart_data = json.load(f)

# Extract data for plotting correctly, handling both nominal and quantitative data
if 'Column Name' in chart_data['datasets']['data-85d48ef46f547bd16ab0f88b32c209fb']:
    # Nominal data (e.g., categories like 'A', 'B', 'C')
    x = [d['Column Name'] for d in chart_data['datasets']['data-85d48ef46f547bd16ab0f88b32c209fb']]
    y = [d['Unique Value Count'] for d in chart_data['datasets']['data-85d48ef46f547bd16ab0f88b32c209fb']]
else:
    # Quantitative data (e.g., numeric values)
    x = [d['Value'] for d in chart_data['datasets']['data-85d48ef46f547bd16ab0f88b32c209fb']]
    y = [d['Count'] for d in chart_data['datasets']['data-85d48ef46f547bd16ab0f88b32c209fb']]

# Create Plotly bar chart
fig = go.Figure([go.Bar(x=x, y=y)])

# Customize layout (optional)
fig.update_layout(
    title='Value Counts for Country',
    xaxis_title='Value',
    yaxis_title='Count'
)

# Show the chart
fig.show()
Or even a more elegant one suggested by the LLM:
mport plotly.graph_objects as go
import json

# Load JSON data
with open('value_counts_column_a_bar_chart.json', 'r') as f:
    chart_data = json.load(f)

# Find the correct data key within 'datasets'
data_key = list(chart_data['datasets'].keys())[0]

# Extract data for plotting correctly, handling both nominal and quantitative data
if 'Column Name' in chart_data['datasets'][data_key][0]:
    # Nominal data (e.g., categories like 'A', 'B', 'C')
    x = [d['Column Name'] for d in chart_data['datasets'][data_key][:10]]
    y = [d['Unique Value Count'] for d in chart_data['datasets'][data_key][:10]]
else:
    # Quantitative data (e.g., numeric values)
    x = [d['Value'] for d in chart_data['datasets'][data_key][:10]]
    y = [d['Count'] for d in chart_data['datasets'][data_key][:10]]

# Create Plotly bar chart
fig = go.Figure([go.Bar(x=x, y=y)])

# Customize layout (optional)
fig.update_layout(
    title='Value Counts for Country',
    xaxis_title='Value',
    yaxis_title='Count'
)

# Show the chart
fig.show()
Somewhere in the code is also a trim of the first 10 values in order to have similar outcomes. But the final plot looks like it should.
And that my friends is a small “pill” of working with Data Analysis, assisted by a LLM.
Some time ago, I tried to write some python code in order to grab each unique IP from my traffic logs and trying to trace it so that We can find similar nodes which were used for the jumps.
This is also a good exercise in order to improve the basic dataframe information and a good baseline for some explorations.
I will put here the code so that it is available for me as reference and also maybe for you if you want to take pieces of it.
I know that it is not optimised, but you can modify it or maybe use a chatbot to improve it.
import pymongo
import scapy.all as scapy

myclient = pymongo.MongoClient("mongodb://localhost:27017/")
db = myclient["mydatabase"]
read_col = db["unique_ip"]
write_col = db["unique_ip_trace_tcp"]
lastid = 0
index_last_ip = write_col.find().sort([('_id', -1)]).limit(1)
for doc in index_last_ip:
    doc['source_ip']
    index_id = read_col.find({"payload":doc['source_ip']})
    for elem in index_id:
        lastid=elem['id']
print(lastid)
for i in range(lastid, read_col.count_documents({})):
    mydoc = read_col.find({ "id": i })
    for x in mydoc:
        try:
            for element in x['payload']:
                response = {}
                ans, unans = scapy.traceroute(element)
                response['source_ip'] = element
                payload = {}
                for sdr,rcv in ans:
                    payload[str(sdr.ttl)]= rcv.src
                response['payload'] = payload
                write_col.insert_one(response)
        except Exception as e:
            print(e)
            continue
I am putting this here more as a reference since this error appeared a couple of time when using urllib library.
For example there is the classical case of
from urllib.request import urlopen

from bs4 import BeautifulSoup


html = urlopen('http://en.wikipedia.org/wiki/Kevin_Bacon')
bs = BeautifulSoup(html, 'html.parser')
for link in bs.find_all('a'):
    if 'href' in link.attrs:
        print(link.attrs['href'])
And if you run it for the first time in your Jupyter Kernel, it will return
URLError: <urlopen error [SSL: CERTIFICATE_VERIFY_FAILED] certificate verify failed: unable to get local issuer certificate (_ssl.c:997)>
The easiest way to fix it is by adding two extra lines to the code
from urllib.request import urlopen
import ssl
from bs4 import BeautifulSoup

ssl._create_default_https_context = ssl._create_unverified_context

html = urlopen('http://en.wikipedia.org/wiki/Kevin_Bacon')
bs = BeautifulSoup(html, 'html.parser')
for link in bs.find_all('a'):
    if 'href' in link.attrs:
        print(link.attrs['href'])
The first one is to import the ssl library and the second one to actually create an unverified context.
The interesting fact is that once this is loaded to the kernel, it will actually work even if you comment the lines and re-execute it.
Currently I am reading one of the chapters from Python Data Science Handbook and saw that there are some magic commands that can be used in IPython.
One of them gives you the possibility to time the execution and it’s called %timeit. Going further it seems that there are other commands like %prun but it is not present in plain old Python, so I asked Gemini, the lovely chatbot, what were the alternatives. Here is his answer:
Unfortunately, there’s no single command in standard Python that perfectly replicates the functionality of IPython’s %prun magic command. Let me explain why and provide the closest alternatives:
What %prun Does
IPython’s %prun offers detailed profiling of a code statement. It shows you:
Number of times each function was called.
Time spent in each function (cumulative and per-call).
Provides line-by-line profiling, showing execution time for each code line within a function.
Timeit Module:
Best for measuring short code snippets’ execution time.
Not a full-fledged profiler, but useful for quick timing comparisons.
Example: Using cProfile
Python
import cProfile
def my_function(): # Code you want to profile
if __name__ == ‘__main__’: cProfile.run(‘my_function()’)
Choosing the Right Tool
For general profiling: cProfile is a good starting point.
For line-by-line analysis: Consider line_profiler.
For simple timing: timeit is sufficient.
So I tried to install line_profiler with pip, created a test py file with the example from the book
@profile
def sum_of_lists(N):
            total = 0
            for i in range(5):
                L = [j ^ (j >> i) for j in range(N)]
                total += sum(L)
            return total

sum_of_lists(1000000)
It seems like in order to grab the statistics you need to use kernprof which I likely found in my anaconda installation.
I executed it with the following output
kernprof -l lineprofiler_test.py
Wrote profile results to lineprofiler_test.py.lprof
Inspect results with:
python -m line_profiler -rmt "lineprofiler_test.py.lprof"
python -m line_profiler -rmt "lineprofiler_test.py.lprof"
Timer unit: 1e-06 s

Total time: 0.906589 s
File: lineprofiler_test.py
Function: sum_of_lists at line 1

Line #      Hits         Time  Per Hit   % Time  Line Contents
==============================================================
     1                                           @profile
     2                                           def sum_of_lists(N):
     3         1         21.0     21.0      0.0      total = 0
     4         6         51.0      8.5      0.0      for i in range(5):
     5         5     862782.0 172556.4     95.2          L = [j ^ (j >> i) for j in range(N)]
     6         5      43735.0   8747.0      4.8          total +=sum(L)
     7         1          0.0      0.0      0.0      return total

  0.91 seconds - lineprofiler_test.py:1 - sum_of_lists
Which is kind of cool taking into consideration that we wrote in the past a lot of scripts without optimising for performance.
It’s not elegant by any means, but it works. As an advise, please don’t over complicate thinks more than they need.
In the last example i figured i wanted to create a list of GroupInfo objects for each line that was returned from consumer group script. Bad idea as you shall see below
So, in addition to what i wrote in the last article, now it’s not just printing the dictionary but order it, by partition.
def constructgroupdict():
 groupagregate = {}
 group_list = getgroups()
 for group in group_list:
    groupagregate[group] = getgroupinfo(group)

 for v in groupagregate.values():
    v.sort(key = lambda re: int(re.partition))

 return groupagregate

def printgroupdict():
 groupdict = constructgroupdict()
 infile = open('/etc/datadog-agent/conf.d/kafka_consumer.d/kafka_consumer.yaml.template','a')
 for k,v in groupdict.items():
    infile.write('      '+k+':\n')
    topics = []
    testdict = {}
    for re in v:
        if re.topic not in topics:
           topics.append(re.topic)
    for x in topics:
        partitions = []
        for re in v:
           if (re.topic == x):
              partitions.append(re.partition)
        testdict[x] = partitions
    for gr,partlst in testdict.items():
        infile.write('        '+gr+': ['+', '.join(partlst)+']\n')
 infile.close()
 os.rename('/etc/datadog-agent/conf.d/kafka_consumer.d/kafka_consumer.yaml.template','/etc/datadog-agent/conf.d/kafka_consumer.d/kafka_consumer.yaml')

printgroupdict()
And after that, it’s quite hard to get only the unique value for the topic name.
The logic i chose to grab all the data per consumer group is related to the fact that querying the cluster takes a very long time, so if i wanted to grab another set of data filtered by topic, i would have been very time costly.
In the way that is written now, there are a lot of for loop, that should become challenging in care there are too many records to process. Fortunately, this should not be the case for consumer groups in a normal case.
The easiest way to integrate the info in kafka_consumer.yaml, in our case is to create a template called kafka_consumer.yaml.template
init_config:
  # Customize the ZooKeeper connection timeout here
  # zk_timeout: 5
  # Customize the Kafka connection timeout here
  # kafka_timeout: 5
  # Customize max number of retries per failed query to Kafka
  # kafka_retries: 3
  # Customize the number of seconds that must elapse between running this check.
  # When checking Kafka offsets stored in Zookeeper, a single run of this check
  # must stat zookeeper more than the number of consumers * topic_partitions
  # that you're monitoring. If that number is greater than 100, it's recommended
  # to increase this value to avoid hitting zookeeper too hard.
  # https://docs.datadoghq.com/agent/faq/how-do-i-change-the-frequency-of-an-agent-check/
  # min_collection_interval: 600
  #
  # Please note that to avoid blindly collecting offsets and lag for an
  # unbounded number of partitions (as could be the case after introducing
  # the self discovery of consumer groups, topics and partitions) the check
  # will collect at metrics for at most 200 partitions.


instances:
  # In a production environment, it's often useful to specify multiple
  # Kafka / Zookeper nodes for a single check instance. This way you
  # only generate a single check process, but if one host goes down,
  # KafkaClient / KazooClient will try contacting the next host.
  # Details: https://github.com/DataDog/dd-agent/issues/2943
  #
  # If you wish to only collect consumer offsets from kafka, because
  # you're using the new style consumers, you can comment out all
  # zk_* configuration elements below.
  # Please note that unlisted consumer groups are not supported at
  # the moment when zookeeper consumer offset collection is disabled.
  - kafka_connect_str:
      - localhost:9092
    zk_connect_str:
      - localhost:2181
    # zk_iteration_ival: 1  # how many seconds between ZK consumer offset
                            # collections. If kafka consumer offsets disabled
                            # this has no effect.
    # zk_prefix: /0.8

    # SSL Configuration

    # ssl_cafile: /path/to/pem/file
    # security_protocol: PLAINTEXT
    # ssl_check_hostname: True
    # ssl_certfile: /path/to/pem/file
    # ssl_keyfile: /path/to/key/file
    # ssl_password: password1

    # kafka_consumer_offsets: false
    consumer_groups:
It’s true that i keep only one string for connectivity on Kafka and Zookeeper, and that things are a little bit more complicated once SSL is configured (but this is not our case, yet).
This is out of my expertise but i wanted to shared it anyways. One colleague wanted to help him with the creation of a pair key:value from one command that lists the processes, in python. With a little bit of testing i came to the following form:
import os
import subprocess
from subprocess import Popen, PIPE
username = subprocess.Popen(['/bin/ps','-eo','pid,uname'], stdout=PIPE, stderr=PIPE)
firstlist = username.stdout.read().split('\n')
dict = {}
for str in firstlist:
  if (str != ''):
    secondlist = str.split()
    key = secondlist[0]
    value = secondlist[1]
    dict[key]=value
print(dict)
Now, i think there are better ways to write this but it works also in this way.
If you find better ways, please leave a message 🙂
Just want to share you that i managed to install the Jupyter Notebook(http://jupyter.org) on a Raspberry PI 2 without any real problems. Beside a microSD card and a Raspberry you need to read this and that would be all.
So, you will need a image of Raspbian from https://www.raspberrypi.org/downloads/raspbian/ (i selected the lite version without the GUI, you really don’t need that actually). In installed it on the card with Linux so i executed a command similar with dd if=[path_to_image]/[image_name] of=[sd_device_name taken from fdisk -l without partition id usually /dev/mmcblk0] bs=4MB; sync. The sync command is added just to be sure that all files are syncronized to card before remove it. We have now a working image that we can use on raspberry, it’s fair to try boot it.
Once it’s booted login with user pi and password raspberry. I am a fan of running the resize steps which you can find here https://coderwall.com/p/mhj8jw/raspbian-how-to-resize-the-root-partition-to-fill-sd-card.
Ok, so we are good to go on installing Jupyter Notebook, at first we need to check what Python version we have installed and in my case it was 2.7.13 (it should be shown by running python –version). In this case then we need to use pip for this task, and it’s not present by default on the image.
Run sudo apt-get install python-pip, after this is done please run pip install jupyter. It will take some time, but when it is done you will have a fresh installation in pi homedir(/home/pi/.local).
It is true that we need also a service, and in order to do that, please create following path with following file:
/usr/lib/systemd/system/jupyter.service
You are probably wondering from where do you get the config file. This will be easy, just run /home/pi/.local/bin/jupyter notebook –generate-config
After the file is created, in order to activate the service and enable it there are sudo systemctl enable jupyter.service and sudo systemctl start jupyter.service
You have now a fresh and auto managed jupyter service. It will be started only on the localhost by default, but in the next article i will tell you also the modifications to be executed in order to run it remotely and also install scala kernel.