Categories
Uncategorized

Getting stocks basic data using yfinance

Hi,

If you are thinking of investing and also to create a perfect opportunity so that you can play with data in pandas, here is the use case I am working on.

Basically, from what I understood, if you want to value invest, there are two main parameters to take a look at before doing any other in depth research: P/B and P/E. Both of them show if the company has the potential to grow.

How can we retrieve these parameters using Python from Yahoo Finance for example … and the code that worked for me is as follows:

import yfinance as yf
import pandas as pd

payload=pd.read_html('https://en.wikipedia.org/wiki/List_of_S%26P_500_companies')
first_table = payload[0]
second_table = payload[1]
df_sp = first_table

statscsv = open('stats.csv', 'a')

for value in df_sp['Symbol']:
    stock = yf.Ticker(value)
    if 'priceToBook' in stock.info:
        statscsv.write(value+","+str(stock.info['priceToBook'])+","+str(stock.info['priceToSalesTrailing12Months'])+"\n")

statscsv.close()

I’ve been trying a lot to put the info directly in a pandas DataFrame and it did not work so for the purpose of querying the API only once, it makes a lot of sense to store it in an CSV file saved locally.

After it is saved locally you can manually load it to the DataFrame object by using (for my usage i manually added the column names into the file like Symbol,PB,PE at the beginning)

df_pb = pd.read_csv("stats.csv")

From what I saw, in some cases P/B data is not available in the output so the value ‘None’.

You can manually change that by replacing it with 0 and store it in a different DataFrame, like this

df_pb_clean = df_pb.replace({"None":"0"})

After you done this, you need to also convert the types of columns from object to float64 so that you can query specific values

df_pb_clean['PB'] = df_pb_clean['PB'].astype(float)
df_pb_clean['PE'] = df_pb_clean['PE'].astype(float)

After all of this is done, you can query it just as easy as

df_pb_green = df_pb_clean.query('0.0 < PB < 2.0')

And after that filter maybe also P/E for you use case.

The main goal is that we filter only the company with growth so that we can try to retrieve historical data and see main methods of analysis.

Cheers

Categories
Uncategorized

Editing Windows registry entries(hive) from Linux

Hi,

I want to share this with you and also it’s also very useful for me in case i come to this problem again.

The main reason for this is related to the fact that my Windows installation will not boot anymore. We thought that it was something related to a registry entry, so i started to take a look how can registries be modified from Linux (later saw that it was much easier to do it with a bootable Windows stick, a cmd window and regedit)

From what i managed to research on the net, it seems that the only tool for this scope is chntpw

I will no go into details o installing this tool, you can find that in different posts from other sites. What i consider important is how you find the right “hive” to edit (and by hive they understand directory structure)

So, in order to have access to the registry, you will need to mount the Windows partition on Linux.

It should be relatively easy, find the partition using sudo fdisk -l and after that for example mkdir /mnt/windows; sudo mount /dev/sda2 (for example since sda1 should be the boot partition) /mnt/windows

After it is mounted, the easiest way to see the trees is by listing the content of /mnt/windows/Windows/System32/config

And it should look similar to this:

-rwxrwxrwx 1 root root 5505024 May 9 10:50 DRIVERS
-rwxrwxrwx 1 root root 2776 May 14 15:35 netlogon.ftl
-rwxrwxrwx 1 root root 18612224 May 15 2019 SYSTEM
-rwxrwxrwx 1 root root 96206848 May 15 2019 SOFTWARE
-rwxrwxrwx 1 root root 786432 May 15 2019 DEFAULT
-rwxrwxrwx 2 root root 53215232 May 15 2019 COMPONENTS

And of course a lot more other directories.

To edit one of the trees it as simple as running

me@mintworkstation:/mnt/windows/Windows/System32/config$ chntpw -e SYSTEM
chntpw version 1.00 140201, (c) Petter N Hagen
Hive name (from header): <\Windows\system32\config\SYSTEM>
ROOT KEY at offset: 0x001020 * Subkey indexing type is: 686c
File size 18612224 [11c0000] bytes, containing 3776 pages (+ 1 headerpage)
Used for data: 257785/18420128 blocks/bytes, unused: 13/1632 blocks/bytes.

Simple registry editor. ? for help.

And the simplest way to navigate is by using ls to list and cd to change o a smaller tree (please put the name of the tree without “<” and “>” like, cd Software for example.

Once you arrived at the record you want to edit just call ed [record_name] It will show you the actual value and ask you what is the update one.

Once the changes are done, just press q and it will as you to same the registry hive. After it is saved, you are all done.

That would be all. Cheers.

Categories
Uncategorized

Register RancherOs to the Rancher framework

Hi,

After we were able to login via ssh on our machines, it’s time to put them to use by subscribing them to a orchestrating framework. One free and pretty powerful framework of such kind is given by the same company. In order to use it you will need to have Docker installed, more info on this topic following the link

 https://docs.rancher.com/rancher/v1.5/en/installing-rancher/installing-server/

Until now i haven’t tried the option for a HA configuration, i will do that in the near future and post the findings but for now it should be enough if we deploy a standard container for the management.

Using the command from the documentation i have managed to grab the image and start the following container:

417930c9f375 rancher/server "/usr/bin/entry /u..." 2 weeks ago Up 6 minutes 3306/tcp, 0.0.0.0:8080->8080/tcp eloquent_goodall

We have also the possibility to check the image using the docker images  command and we will have the following result:

rancher/server latest 2751db6ea7ec 4 weeks ago 935 MB

Once the container is started, you can access the UI by going to the address http://127.0.0.1:8080 (please keep in mind that you have binded the ports to be forwarded and accessible from any IP range, that is what 0.0.0.0:8080->8080/tcp should mean, if you want to be accessible for a specific range or IP please change this on docker run command.

Ok, once the administration console has been loaded you can go to Infrastructure -> Hosts -> Add Host. Please do not use the default site address, it is relevant only for the local container, instead it can be replaced by  http://[jumpserver ip address]:8080This will be used in order to obtain the registration string for the agents. When pressing OK, you will be redirected to a window with the necessary steps to be done for registration, please keep it open.

After connecting via ssh to the Rancher machine, please make sure that you have access to the Docker hub repo. You can easily do that by running docker search rancher. If there is a timeout error, please take a look on configuring proxy for docker, in our case on private machines it can be done using the following lines in cloud-config.yml located under /var/lib/rancher/conf

rancher:
network:
http_proxy: http://[user]:[password]@[proxyip]:[proxyport]
https_proxy: http://[user]:[password]@[proxyip]:[proxyport]

These lines being added you will need to reload the docker daemon by using the command system-docker restart docker and it should work.

Now go to the UI page and copy the string at the last step in our Rancher server window, it will start downloading the necessary containers in order to link with the framework.

This being done some images will be downloaded and started to the machine and started:

[rancher@rancher conf]$ docker images | grep rancher
rancher/scheduler v0.7.5 e7ff16ba4444 2 weeks ago 241.9 MB
rancher/network-manager v0.5.3 0f224908d730 2 weeks ago 241.6 MB
rancher/metadata v0.8.11 19b37bb3e242 5 weeks ago 251.5 MB
rancher/agent v1.2.1 9cecf992679f 5 weeks ago 233.7 MB
rancher/scheduler v0.7.4 7a32d7571cad 5 weeks ago 241.9 MB
rancher/net v0.9.4 5ac4ae5d7fa4 5 weeks ago 264.3 MB
rancher/network-manager v0.4.8 45bdcd2b1944 6 weeks ago 241.6 MB
rancher/dns v0.14.1 4e37fc4150c2 6 weeks ago 239.8 MB
rancher/healthcheck v0.2.3 491349141109 10 weeks ago 383.3 MB
rancher/net holder bb516596ce5a 3 months ago 261.7 MB
[rancher@rancher conf]$ docker ps -a | grep rancher
a3fde18ebdbd rancher/scheduler:v0.7.5 "/.r/r /rancher-entry" 3 days ago Exited (0) 3 days ago r-scheduler-scheduler-1-37fd65ec
35c7bbc1cb42 rancher/network-manager:v0.5.3 "/rancher-entrypoint." 3 days ago Up 30 minutes r-network-services-network-manager-1-57e1bbbd
3a048010be3d rancher/scheduler:v0.7.4 "/.r/r /rancher-entry" 2 weeks ago Exited (0) 3 days ago r-scheduler-scheduler-1-de6ec66f
fad7d11141aa rancher/net:v0.9.4 "/rancher-entrypoint." 2 weeks ago Up 29 minutes r-ipsec-ipsec-router-1-af053a8c
b7ce7b4f8520 rancher/dns:v0.14.1 "/rancher-entrypoint." 2 weeks ago Up 30 minutes r-network-services-metadata-dns-1-438fbeaa
30e5cab4b4c6 rancher/metadata:v0.8.11 "/rancher-entrypoint." 2 weeks ago Up 30 minutes r-network-services-metadata-1-827c71e3
382ebf55c3c1 rancher/net:holder "/.r/r /rancher-entry" 2 weeks ago Up 30 minutes r-ipsec-ipsec-1-55aeea30
0223f1ffe986 rancher/healthcheck:v0.2.3 "/.r/r /rancher-entry" 2 weeks ago Up 30 minutes r-healthcheck-healthcheck-1-f00a6858
03652d781c9a rancher/net:v0.9.4 "/rancher-entrypoint." 2 weeks ago Up 30 minutes r-ipsec-ipsec-cni-driver-1-797e0060
1b6d1664c801 rancher/agent:v1.2.1 "/run.sh run" 2 weeks ago Up 31 minutes rancher-agent
c8b8e4ddf91c rancher/agent:v1.2.1 "/run.sh http://10.0." 2 weeks ago Exited (0) 2 weeks ago furious_bohr

And also the server will appear in the UI. In next posts we will try to deploy some services from the catalog.

Cheers

Categories
Uncategorized

Install RancherOS on VirtualBox and configure it for ssh access

Hi,

If you are not familiar with what is RancherOS you can learn more from this link: Rancher docu It’s basically a very small Linux distro that runs all the processes as Docker containers (including the system processes).

So, starting from here, we will need a RancherOS image which you can download from the following location: Rancher git. After doing that you will need a VirtualBox machine with minimum 1GB of RAM (the reason for this is that Rancher will run at first from the memory). The size of the root partition can be as big as you like, no extra video configurations are required since it will run in CLI mode.

You also need to know that an extra jump server (or a server that is accessible over ssh protocol) is required in order to successfully configure your single/multiple running instance of Rancher and that is for a simple reason. As far as i managed to test, no mount command is working of an external USB storage (please be aware that we are talking about an isolated environment)  and also copy/paste is not running by default without Virtualbox Guest Tools installed (unfortunately this is also not possible because we will not have a GUI and these kind of releases are not supported, i think this is also the case of CoreOs). Please make sure that the servers are reachable and have sshd installed and configured.

Since Rancher is available only with ssh key login, because of security reasons, you will need to add it before install to the cloud-config.yml

On the jump server you need to generate a rsa key with the ssh-keygen command and it will create in the .ssh directory the following pair of files (this is a list from my test machine) :

-rw-r–r– 1 sorin sorin 394 Mar 21 08:09 id_rsa.pub
-rw——- 1 sorin sorin 1675 Mar 21 08:09 id_rsa

The next step is to build the minimal cloud-config file in order to get access to the machine, and in that purpose we can run the command

echo -e “#cloud-confignssh_authorized_keys:n – $(cat id_rsa.pub)” > $HOME/cloud-config.yml

This will create the only file you need in order to install your “server”.

Ok, it’s time to start our Rancher machine, please make sure that you have the Rancher image mounted in order to boot it. After this process is done you will need to connect to the jump server in order to grab the file created above. Please do that with the following command:

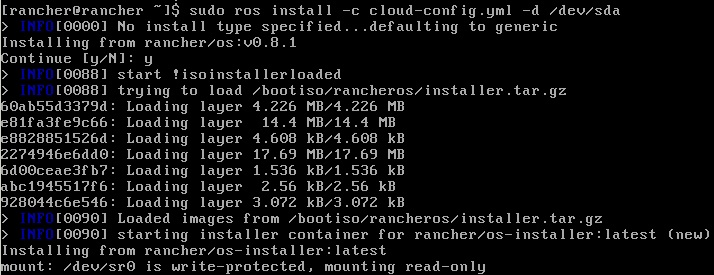
After this is done, we can install it on the local drive. Since it’s more simple with a printscreen i will list another one 🙂

Ok, this being done, you will be propted to restart the machine but before that please make sure that you have unmounted the rancher image from the virtual drive otherwise it will boot from it and not from the actual install.

You are almost done, after restart you can access the server via ssh rancher@[rancher server ip] if you used the default id_rsa key from the .ssh directory, and if not, ssh -i [private key file location] rancher@[rancher server ip]

More articles to come on this topic,

Cheers!

Categories
Uncategorized

We start here

This should be a bold start of an IT technical blog