Hi,
If you are not familiar with what is RancherOS you can learn more from this link: Rancher docu It’s basically a very small Linux distro that runs all the processes as Docker containers (including the system processes).
So, starting from here, we will need a RancherOS image which you can download from the following location: Rancher git. After doing that you will need a VirtualBox machine with minimum 1GB of RAM (the reason for this is that Rancher will run at first from the memory). The size of the root partition can be as big as you like, no extra video configurations are required since it will run in CLI mode.
You also need to know that an extra jump server (or a server that is accessible over ssh protocol) is required in order to successfully configure your single/multiple running instance of Rancher and that is for a simple reason. As far as i managed to test, no mount command is working of an external USB storage (please be aware that we are talking about an isolated environment) and also copy/paste is not running by default without Virtualbox Guest Tools installed (unfortunately this is also not possible because we will not have a GUI and these kind of releases are not supported, i think this is also the case of CoreOs). Please make sure that the servers are reachable and have sshd installed and configured.
Since Rancher is available only with ssh key login, because of security reasons, you will need to add it before install to the cloud-config.yml
On the jump server you need to generate a rsa key with the ssh-keygen command and it will create in the .ssh directory the following pair of files (this is a list from my test machine) :
-rw-r–r– 1 sorin sorin 394 Mar 21 08:09 id_rsa.pub
-rw——- 1 sorin sorin 1675 Mar 21 08:09 id_rsa
The next step is to build the minimal cloud-config file in order to get access to the machine, and in that purpose we can run the command
echo -e “#cloud-confignssh_authorized_keys:n – $(cat id_rsa.pub)” > $HOME/cloud-config.yml
This will create the only file you need in order to install your “server”.
Ok, it’s time to start our Rancher machine, please make sure that you have the Rancher image mounted in order to boot it. After this process is done you will need to connect to the jump server in order to grab the file created above. Please do that with the following command:

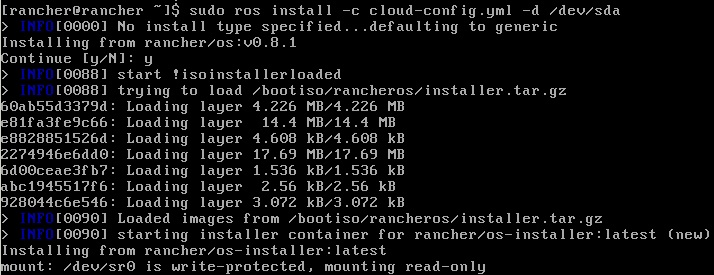
After this is done, we can install it on the local drive. Since it’s more simple with a printscreen i will list another one 🙂
Ok, this being done, you will be propted to restart the machine but before that please make sure that you have unmounted the rancher image from the virtual drive otherwise it will boot from it and not from the actual install.
You are almost done, after restart you can access the server via ssh rancher@[rancher server ip] if you used the default id_rsa key from the .ssh directory, and if not, ssh -i [private key file location] rancher@[rancher server ip]
More articles to come on this topic,
Cheers!