Tag: docker

  • Consumer group coordinator in Kafka using some scala script

    Morning,

    Just a small post regarding returning a consumer group coordinator for a specific consumer group.
    We had the issue that consumer groups are re-balancing and we didn’t knew if it’s related to application logic or the Consumer Group Coordinator was changing and the Kafka cluster was reassign a different one each time. So, a small piece of code was needed. I was using the libraries that are sent with Kafka 1.0.0 for this test so be aware of the classpath update if you want to modify this.

    In order to do the test, i started a standalone Confluent Kafka image which normally listens on port 29092. For more details please consult their documentation here

    I also created a test topic with one partition and same replication factor. Produced some messages in the topic and after that started a console consumer:

    sorin@debian-test:~/kafka_2.11-1.0.0/bin$ ./kafka-console-consumer.sh --bootstrap-server localhost:29092 --topic test --from-beginning
    test
    message
    test message
    

    Once this is started you can also see it using consumer-groups command like this:

    sorin@debian-test:~/kafka_2.11-1.0.0/bin$ ./kafka-consumer-groups.sh --bootstrap-server localhost:29092 --list
    Note: This will not show information about old Zookeeper-based consumers.
    
    console-consumer-49198
    console-consumer-66063
    console-consumer-77631
    

    Now my console consumer is identified by console-consumer-77631 and in order to see the group coordinator you will have to run something like:

    ./getconsumercoordinator.sh localhost 29092 console-consumer-77631
    warning: there were three deprecation warnings; re-run with -deprecation for details
    one warning found
    Creating connection to: localhost 29092 
    log4j:WARN No appenders could be found for logger (kafka.network.BlockingChannel).
    log4j:WARN Please initialize the log4j system properly.
    log4j:WARN See http://logging.apache.org/log4j/1.2/faq.html#noconfig for more info.
    Channel connected
    SLF4J: Failed to load class "org.slf4j.impl.StaticLoggerBinder".
    SLF4J: Defaulting to no-operation (NOP) logger implementation
    SLF4J: See http://www.slf4j.org/codes.html#StaticLoggerBinder for further details.
    GroupCoordinatorResponse(Some(BrokerEndPoint(1001,localhost,29092)),NONE,0)
    

    It’s clear that since we have only one broker, that is also the coordinator.
    Regarding the details for the code i used this link and also, in order to search for all of the dependencies, since i don’t have a scala project, just a script the following command was of great use

    for i in *.jar; do jar -tvf "$i" | grep -Hsi ClassName && echo "$i"; done

    Here is also the code:

    #!/bin/sh
    exec scala -classpath "/home/sorin/kafka_2.11-1.0.0/libs/kafka-clients-1.0.0.jar:/home/sorin/kafka_2.11-1.0.0/libs/kafka_2.11-1.0.0.jar:/home/sorin/kafka_2.11-1.0.0/libs/slf4j-api-1.7.25.jar:/home/sorin/kafka_2.11-1.0.0/libs/jackson-core-2.9.1.jar:/home/sorin/kafka_2.11-1.0.0/libs/jackson-databind-2.9.1.jar:/home/sorin/kafka_2.11-1.0.0/libs/jackson-annotations-2.9.1.jar:/home/sorin/kafka_2.11-1.0.0/libs/log4j-1.2.17.jar" "$0" "$1" "$2" "$@"
    !#
    
    import com.fasterxml.jackson.core._
    import com.fasterxml.jackson.databind.ObjectMapper
    import kafka.network.BlockingChannel
    import kafka.api.GroupCoordinatorRequest
    import kafka.api.GroupCoordinatorResponse
    import org.slf4j.LoggerFactory
    
    val hostname = args(0)
    val port = args(1).toInt
    val group = args(2)
    println("Creating connection to: " + hostname + " " + port + " ")
    
    var channel = new BlockingChannel(hostname, port, 1048576, 1048576, readTimeoutMs = 50000)
    channel.connect()
    if (channel.isConnected) {
      println("Channel connected")
    channel.send(GroupCoordinatorRequest(group))
    val metadataResponse = GroupCoordinatorResponse.readFrom(channel.receive.payload())
    println(metadataResponse) }
    channel.disconnect()
    

    Regarding the code, the first part is to run scala from shell script, you need to update the lasspath with all libraries and also specify how many parameters to be used. In our case this is three. Also, if you won’t add all of the jackson, log4j and slf4j dependencies, it won’t work.

    P.S: It will work also by running exec scala -classpath "/home/sorin/kafka_2.11-1.0.0/libs/*

    Cheers!

  • List differences between two sftp hosts using golang

    Hi,

    Just as a intermediate post as i wanted to play a little bit with golang, let me show you what i managed to put together in some days. I created a virtual machine on which i installed docker and grabbed a sftp image. You can try first two from Docker Hub, it should work.
    So i pulled this image and initiated two containers as shown below:

    eaf3b93798b5        asavartzeth/sftp    "/entrypoint.sh /u..."   21 hours ago        Up About a minute         0.0.0.0:2225->22/tcp   server4
    ec7d7e1d029f        asavartzeth/sftp    "/entrypoint.sh /u..."   21 hours ago        Up About a minute         0.0.0.0:2224->22/tcp   server3
    

    The command to do this looks like:

    docker run --name server3 -v /home/sorin/sftp1:/chroot/sorin:rw -e SFTP_USER=sorin -e SFTP_PASS=pass -p 2224:22 -d asavartzeth/sftp
    docker run --name server4 -v /home/sorin/sftp2:/chroot/sorin:rw -e SFTP_USER=sorin -e SFTP_PASS=pass -p 2225:22 -d asavartzeth/sftp

    Main info to know about these containers is that they should be accessible by user sorin and the path were the external directories are mapped is on /chroot/sorin.

    You can manually test the connection by using a simple command like:

    sftp -P 2224 sorin@localhost

    If you are using the container ip address i observed that you will use the default 22 port to connect to them. Not really clear why but this is not about that.

    Once the servers are up and running you can test the differences between the structure using following code:

    
    package main
    
    import (
    	"fmt"
    
    	"github.com/pkg/sftp"
    	"golang.org/x/crypto/ssh"
    )
    
    type ServerFiles struct {
    	Name  string
    	files []string
    }
    
    func main() {
    
    	server1client := ConnectSftp("localhost:2224", "sorin", "pass")
    	server1files := ReadPath(server1client)
    	server1struct := BuildStruct("172.17.0.2", server1files)
    	server2client := ConnectSftp("localhost:2225", "sorin", "pass")
    	server2files := ReadPath(server2client)
    	server2struct := BuildStruct("172.17.0.3", server2files)
    	diffilesstruct := CompareStruct(server1struct, server2struct)
            for _, values := range diffilestruct.files {
            fmt.Printf("%s %s\n", diffilesstruct.Name, values)
     }
    	CloseConnection(server1client)
    	CloseConnection(server2client)
    }
    func CheckError(err error) {
    	if err != nil {
    		panic(err)
    	}
    }
    func ConnectSftp(address string, user string, password string) *sftp.Client {
    	config := &ssh.ClientConfig{
    		User: user,
    		Auth: []ssh.AuthMethod{
    			ssh.Password(password),
    		},
    		HostKeyCallback: ssh.InsecureIgnoreHostKey(),
    	}
    	conn, err := ssh.Dial("tcp", address, config)
    	CheckError(err)
    
    	client, err := sftp.NewClient(conn)
    	CheckError(err)
    
    	return client
    }
    func ReadPath(client *sftp.Client) []string {
    	var paths []string
    	w := client.Walk("/")
    	for w.Step() {
    		if w.Err() != nil {
    			continue
    		}
    		
    		paths = append(paths, w.Path())
    	}
    	return paths
    }
    func BuildStruct(address string, files []string) *ServerFiles {
    	server := new(ServerFiles)
    	server.Name = address
    	server.files = files
    
    	return server
    }
    func CompareStruct(struct1 *ServerFiles, struct2 *ServerFiles) *ServerFiles {
    
    	diff := difference(struct1.files, struct2.files)
    	diffstruct := new(ServerFiles)
    	for _, value := range diff {
    		for _, valueP := range struct1.files {
    			if valueP == value {
    				
    				diffstruct.Name = struct1.Name
    				diffstruct.files = append(diffstruct.files, valueP)
    			}
    		}
    		for _, valueQ := range struct2.files {
    			if valueQ == value {
    				
    				diffstruct.Name = struct2.Name
    				diffstruct.files = append(diffstruct.files, valueQ)
    			}
    		}
    	}
    	return diffstruct
    }
    func difference(slice1 []string, slice2 []string) []string {
    	var diff []string
    
    	// Loop two times, first to find slice1 strings not in slice2,
    	// second loop to find slice2 strings not in slice1
    	for i := 0; i < 2; i++ {
    		for _, s1 := range slice1 {
    			found := false
    			for _, s2 := range slice2 {
    				if s1 == s2 {
    					found = true
    					break
    				}
    			}
    			// String not found. We add it to return slice
    			if !found {
    				diff = append(diff, s1)
    			}
    		}
    		// Swap the slices, only if it was the first loop
    		if i == 0 {
    			slice1, slice2 = slice2, slice1
    		}
    	}
    
    	return diff
    }
    func CloseConnection(client *sftp.Client) {
    	client.Close()
    }

    This actually connects to each server, reads the hole filepath and puts it on a structure. After this is done for both servers, there is a method that compares only the slice part of the struct and returns the differences. On this differences there is another structure constructed with only the differences.
    It is true that i took the differences func from stackoverflow, and it's far from good code, but i am working on it, this is the first draft, i will post different versions as it gets better.

    The output if there are differences will look like this:

    172.17.0.2 /sorin/subdirectory
    172.17.0.2 /sorin/subdirectory/subtest.file
    172.17.0.2 /sorin/test.file
    172.17.0.3 /sorin/test2
    

    If there are no differences that it will just exit.
    Working on improving my golang experience. Keep you posted.

    Cheers!

  • Docker statistics – way to investigate performance

    Hi,

    I wish it would be mine but it isn’t. Quite good article from this week newsletter related to container stats from Docker containers:

    Analyzing Docker container performance with native tools

    Wish you an enjoyable read.

    Cheers!

  • Interesting insight in docker networking mechanism

    Hi,

    This one is not mine, but it’s worth to mention. There are’s always interesting articles in the docker newsletter but i enjoyed very much this series and i highly recommend you to read it and try it:

    http://techblog.d2-si.eu/2017/04/25/deep-dive-into-docker-overlay-networks-part-1.html

    I would really want to work more with docker and hope in the future that i get the chance but for now i resume to posting these kind of interesting “stuff”.

    Cheers!

  • Sysdig container isolation case debugged on kubernetes

    Hi,

    I didn’t get to actual test anything related to this but i managed to find a very interesting article that might be lost if you are not a sysdig fan. You can find it at following link https://sysdig.com/blog/container-isolation-gone-wrong/

    To put into perspective, this tool is used for some very interesting debugging situation, i have played with it some a short period of time and i think i will put in on my list so that i can show you what it can do.

    Cheers

  • Monitoring Kafka node using Docker

    Hi,

    Today i am just going to point you to a very interesting article related to monitoring of Kafka node/nodes using InfluxDB, Grafana and Docker. Hope it is useful, i will surely try it in one of the days.

    https://softwaremill.com/monitoring-apache-kafka-with-influxdb-grafana/

    Now this is not quite standard but nevertheless it is an option.

    Cheers!

  • Register RancherOs to the Rancher framework

    Hi,

    After we were able to login via ssh on our machines, it’s time to put them to use by subscribing them to a orchestrating framework. One free and pretty powerful framework of such kind is given by the same company. In order to use it you will need to have Docker installed, more info on this topic following the link

     https://docs.rancher.com/rancher/v1.5/en/installing-rancher/installing-server/

    Until now i haven’t tried the option for a HA configuration, i will do that in the near future and post the findings but for now it should be enough if we deploy a standard container for the management.

    Using the command from the documentation i have managed to grab the image and start the following container:

    417930c9f375 rancher/server "/usr/bin/entry /u..." 2 weeks ago Up 6 minutes 3306/tcp, 0.0.0.0:8080->8080/tcp eloquent_goodall

    We have also the possibility to check the image using the docker images  command and we will have the following result:

    rancher/server latest 2751db6ea7ec 4 weeks ago 935 MB

    Once the container is started, you can access the UI by going to the address http://127.0.0.1:8080 (please keep in mind that you have binded the ports to be forwarded and accessible from any IP range, that is what 0.0.0.0:8080->8080/tcp should mean, if you want to be accessible for a specific range or IP please change this on docker run command.

    Ok, once the administration console has been loaded you can go to Infrastructure -> Hosts -> Add Host. Please do not use the default site address, it is relevant only for the local container, instead it can be replaced by  http://[jumpserver ip address]:8080This will be used in order to obtain the registration string for the agents. When pressing OK, you will be redirected to a window with the necessary steps to be done for registration, please keep it open.

    After connecting via ssh to the Rancher machine, please make sure that you have access to the Docker hub repo. You can easily do that by running docker search rancher. If there is a timeout error, please take a look on configuring proxy for docker, in our case on private machines it can be done using the following lines in cloud-config.yml located under /var/lib/rancher/conf

    rancher:
    network:
    http_proxy: http://[user]:[password]@[proxyip]:[proxyport]
    https_proxy: http://[user]:[password]@[proxyip]:[proxyport]

    These lines being added you will need to reload the docker daemon by using the command system-docker restart docker and it should work.

    Now go to the UI page and copy the string at the last step in our Rancher server window, it will start downloading the necessary containers in order to link with the framework.

    This being done some images will be downloaded and started to the machine and started:

    [rancher@rancher conf]$ docker images | grep rancher
    rancher/scheduler v0.7.5 e7ff16ba4444 2 weeks ago 241.9 MB
    rancher/network-manager v0.5.3 0f224908d730 2 weeks ago 241.6 MB
    rancher/metadata v0.8.11 19b37bb3e242 5 weeks ago 251.5 MB
    rancher/agent v1.2.1 9cecf992679f 5 weeks ago 233.7 MB
    rancher/scheduler v0.7.4 7a32d7571cad 5 weeks ago 241.9 MB
    rancher/net v0.9.4 5ac4ae5d7fa4 5 weeks ago 264.3 MB
    rancher/network-manager v0.4.8 45bdcd2b1944 6 weeks ago 241.6 MB
    rancher/dns v0.14.1 4e37fc4150c2 6 weeks ago 239.8 MB
    rancher/healthcheck v0.2.3 491349141109 10 weeks ago 383.3 MB
    rancher/net holder bb516596ce5a 3 months ago 261.7 MB
    [rancher@rancher conf]$ docker ps -a | grep rancher
    a3fde18ebdbd rancher/scheduler:v0.7.5 "/.r/r /rancher-entry" 3 days ago Exited (0) 3 days ago r-scheduler-scheduler-1-37fd65ec
    35c7bbc1cb42 rancher/network-manager:v0.5.3 "/rancher-entrypoint." 3 days ago Up 30 minutes r-network-services-network-manager-1-57e1bbbd
    3a048010be3d rancher/scheduler:v0.7.4 "/.r/r /rancher-entry" 2 weeks ago Exited (0) 3 days ago r-scheduler-scheduler-1-de6ec66f
    fad7d11141aa rancher/net:v0.9.4 "/rancher-entrypoint." 2 weeks ago Up 29 minutes r-ipsec-ipsec-router-1-af053a8c
    b7ce7b4f8520 rancher/dns:v0.14.1 "/rancher-entrypoint." 2 weeks ago Up 30 minutes r-network-services-metadata-dns-1-438fbeaa
    30e5cab4b4c6 rancher/metadata:v0.8.11 "/rancher-entrypoint." 2 weeks ago Up 30 minutes r-network-services-metadata-1-827c71e3
    382ebf55c3c1 rancher/net:holder "/.r/r /rancher-entry" 2 weeks ago Up 30 minutes r-ipsec-ipsec-1-55aeea30
    0223f1ffe986 rancher/healthcheck:v0.2.3 "/.r/r /rancher-entry" 2 weeks ago Up 30 minutes r-healthcheck-healthcheck-1-f00a6858
    03652d781c9a rancher/net:v0.9.4 "/rancher-entrypoint." 2 weeks ago Up 30 minutes r-ipsec-ipsec-cni-driver-1-797e0060
    1b6d1664c801 rancher/agent:v1.2.1 "/run.sh run" 2 weeks ago Up 31 minutes rancher-agent
    c8b8e4ddf91c rancher/agent:v1.2.1 "/run.sh http://10.0." 2 weeks ago Exited (0) 2 weeks ago furious_bohr

    And also the server will appear in the UI. In next posts we will try to deploy some services from the catalog.

    Cheers

  • Install RancherOS on VirtualBox and configure it for ssh access

    Hi,

    If you are not familiar with what is RancherOS you can learn more from this link: Rancher docu It’s basically a very small Linux distro that runs all the processes as Docker containers (including the system processes).

    So, starting from here, we will need a RancherOS image which you can download from the following location: Rancher git. After doing that you will need a VirtualBox machine with minimum 1GB of RAM (the reason for this is that Rancher will run at first from the memory). The size of the root partition can be as big as you like, no extra video configurations are required since it will run in CLI mode.

    You also need to know that an extra jump server (or a server that is accessible over ssh protocol) is required in order to successfully configure your single/multiple running instance of Rancher and that is for a simple reason. As far as i managed to test, no mount command is working of an external USB storage (please be aware that we are talking about an isolated environment)  and also copy/paste is not running by default without Virtualbox Guest Tools installed (unfortunately this is also not possible because we will not have a GUI and these kind of releases are not supported, i think this is also the case of CoreOs). Please make sure that the servers are reachable and have sshd installed and configured.

    Since Rancher is available only with ssh key login, because of security reasons, you will need to add it before install to the cloud-config.yml

    On the jump server you need to generate a rsa key with the ssh-keygen command and it will create in the .ssh directory the following pair of files (this is a list from my test machine) :

    -rw-r–r– 1 sorin sorin 394 Mar 21 08:09 id_rsa.pub
    -rw——- 1 sorin sorin 1675 Mar 21 08:09 id_rsa

    The next step is to build the minimal cloud-config file in order to get access to the machine, and in that purpose we can run the command

    echo -e “#cloud-confignssh_authorized_keys:n – $(cat id_rsa.pub)” > $HOME/cloud-config.yml

    This will create the only file you need in order to install your “server”.

    Ok, it’s time to start our Rancher machine, please make sure that you have the Rancher image mounted in order to boot it. After this process is done you will need to connect to the jump server in order to grab the file created above. Please do that with the following command:

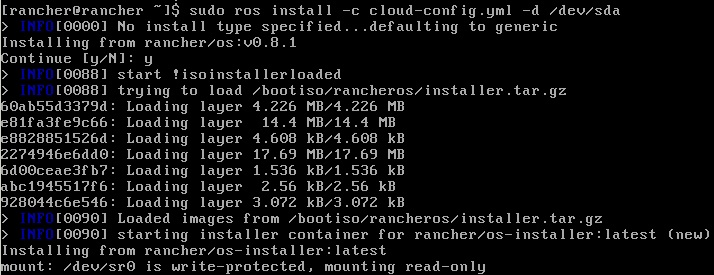
    After this is done, we can install it on the local drive. Since it’s more simple with a printscreen i will list another one 🙂

    Ok, this being done, you will be propted to restart the machine but before that please make sure that you have unmounted the rancher image from the virtual drive otherwise it will boot from it and not from the actual install.

    You are almost done, after restart you can access the server via ssh rancher@[rancher server ip] if you used the default id_rsa key from the .ssh directory, and if not, ssh -i [private key file location] rancher@[rancher server ip]

    More articles to come on this topic,

    Cheers!