Tag: rancher

  • Small Vagrant config file for Rancher deploy

    Hi,

    Just wanted to post this also, if it’s not that nice the config using a jumpserver, surely we can convert that to code (Puppet/Ansible), you can also use Vagrant. The main issue that i faced when i tried to create my setup is that for a reason (not really sure why, Vagrant on Windows runs very slow). However, i chose to give you one piece of Vagrantfile for a minimal setup on which you can grab the Rancher server framework and also the client containers.

    Here is it:

    # -*- mode: ruby -*-
    # vi: set ft=ruby :
    Vagrant.configure("2") do |config|
    config.vm.define "master" do |master|
    master.vm.box = "centos/7"
    master.vm.hostname = 'master'
    master.vm.network "public_network", bridge: "enp0s25"
    end
    config.vm.define "slave" do |slave|
    slave.vm.box = "centos/7"
    slave.vm.hostname = 'slave'
    slave.vm.network "public_network", bridge: "enp0s25"
    end
    config.vm.define "swarmmaster" do |swarmmaster|
    swarmmaster.vm.box = "centos/7"
    swarmmaster.vm.hostname = 'swarmmaster'
    swarmmaster.vm.network "public_network", bridge: "enp0s25"
    end
    config.vm.define "swarmslave" do |swarmclient|
    swarmclient.vm.box = "centos/7"
    swarmclient.vm.hostname = 'swarmclient'
    swarmclient.vm.network "public_network", bridge: "enp0s25"
    end
    end


    Do not worry about the naming of the machines, you can change them to whatever you like, the main catch is to bridge the public network in all of them in order to be able to communicate with each other and also have access to the docker hub. Beside that everything else that i posted regarding the registry to the Rancher framework is still valid.

    Thank you for your time,

    Cheers!

  • Register RancherOs to the Rancher framework

    Hi,

    After we were able to login via ssh on our machines, it’s time to put them to use by subscribing them to a orchestrating framework. One free and pretty powerful framework of such kind is given by the same company. In order to use it you will need to have Docker installed, more info on this topic following the link

     https://docs.rancher.com/rancher/v1.5/en/installing-rancher/installing-server/

    Until now i haven’t tried the option for a HA configuration, i will do that in the near future and post the findings but for now it should be enough if we deploy a standard container for the management.

    Using the command from the documentation i have managed to grab the image and start the following container:

    417930c9f375 rancher/server "/usr/bin/entry /u..." 2 weeks ago Up 6 minutes 3306/tcp, 0.0.0.0:8080->8080/tcp eloquent_goodall

    We have also the possibility to check the image using the docker images  command and we will have the following result:

    rancher/server latest 2751db6ea7ec 4 weeks ago 935 MB

    Once the container is started, you can access the UI by going to the address http://127.0.0.1:8080 (please keep in mind that you have binded the ports to be forwarded and accessible from any IP range, that is what 0.0.0.0:8080->8080/tcp should mean, if you want to be accessible for a specific range or IP please change this on docker run command.

    Ok, once the administration console has been loaded you can go to Infrastructure -> Hosts -> Add Host. Please do not use the default site address, it is relevant only for the local container, instead it can be replaced by  http://[jumpserver ip address]:8080This will be used in order to obtain the registration string for the agents. When pressing OK, you will be redirected to a window with the necessary steps to be done for registration, please keep it open.

    After connecting via ssh to the Rancher machine, please make sure that you have access to the Docker hub repo. You can easily do that by running docker search rancher. If there is a timeout error, please take a look on configuring proxy for docker, in our case on private machines it can be done using the following lines in cloud-config.yml located under /var/lib/rancher/conf

    rancher:
    network:
    http_proxy: http://[user]:[password]@[proxyip]:[proxyport]
    https_proxy: http://[user]:[password]@[proxyip]:[proxyport]

    These lines being added you will need to reload the docker daemon by using the command system-docker restart docker and it should work.

    Now go to the UI page and copy the string at the last step in our Rancher server window, it will start downloading the necessary containers in order to link with the framework.

    This being done some images will be downloaded and started to the machine and started:

    [rancher@rancher conf]$ docker images | grep rancher
    rancher/scheduler v0.7.5 e7ff16ba4444 2 weeks ago 241.9 MB
    rancher/network-manager v0.5.3 0f224908d730 2 weeks ago 241.6 MB
    rancher/metadata v0.8.11 19b37bb3e242 5 weeks ago 251.5 MB
    rancher/agent v1.2.1 9cecf992679f 5 weeks ago 233.7 MB
    rancher/scheduler v0.7.4 7a32d7571cad 5 weeks ago 241.9 MB
    rancher/net v0.9.4 5ac4ae5d7fa4 5 weeks ago 264.3 MB
    rancher/network-manager v0.4.8 45bdcd2b1944 6 weeks ago 241.6 MB
    rancher/dns v0.14.1 4e37fc4150c2 6 weeks ago 239.8 MB
    rancher/healthcheck v0.2.3 491349141109 10 weeks ago 383.3 MB
    rancher/net holder bb516596ce5a 3 months ago 261.7 MB
    [rancher@rancher conf]$ docker ps -a | grep rancher
    a3fde18ebdbd rancher/scheduler:v0.7.5 "/.r/r /rancher-entry" 3 days ago Exited (0) 3 days ago r-scheduler-scheduler-1-37fd65ec
    35c7bbc1cb42 rancher/network-manager:v0.5.3 "/rancher-entrypoint." 3 days ago Up 30 minutes r-network-services-network-manager-1-57e1bbbd
    3a048010be3d rancher/scheduler:v0.7.4 "/.r/r /rancher-entry" 2 weeks ago Exited (0) 3 days ago r-scheduler-scheduler-1-de6ec66f
    fad7d11141aa rancher/net:v0.9.4 "/rancher-entrypoint." 2 weeks ago Up 29 minutes r-ipsec-ipsec-router-1-af053a8c
    b7ce7b4f8520 rancher/dns:v0.14.1 "/rancher-entrypoint." 2 weeks ago Up 30 minutes r-network-services-metadata-dns-1-438fbeaa
    30e5cab4b4c6 rancher/metadata:v0.8.11 "/rancher-entrypoint." 2 weeks ago Up 30 minutes r-network-services-metadata-1-827c71e3
    382ebf55c3c1 rancher/net:holder "/.r/r /rancher-entry" 2 weeks ago Up 30 minutes r-ipsec-ipsec-1-55aeea30
    0223f1ffe986 rancher/healthcheck:v0.2.3 "/.r/r /rancher-entry" 2 weeks ago Up 30 minutes r-healthcheck-healthcheck-1-f00a6858
    03652d781c9a rancher/net:v0.9.4 "/rancher-entrypoint." 2 weeks ago Up 30 minutes r-ipsec-ipsec-cni-driver-1-797e0060
    1b6d1664c801 rancher/agent:v1.2.1 "/run.sh run" 2 weeks ago Up 31 minutes rancher-agent
    c8b8e4ddf91c rancher/agent:v1.2.1 "/run.sh http://10.0." 2 weeks ago Exited (0) 2 weeks ago furious_bohr

    And also the server will appear in the UI. In next posts we will try to deploy some services from the catalog.

    Cheers

  • Install RancherOS on VirtualBox and configure it for ssh access

    Hi,

    If you are not familiar with what is RancherOS you can learn more from this link: Rancher docu It’s basically a very small Linux distro that runs all the processes as Docker containers (including the system processes).

    So, starting from here, we will need a RancherOS image which you can download from the following location: Rancher git. After doing that you will need a VirtualBox machine with minimum 1GB of RAM (the reason for this is that Rancher will run at first from the memory). The size of the root partition can be as big as you like, no extra video configurations are required since it will run in CLI mode.

    You also need to know that an extra jump server (or a server that is accessible over ssh protocol) is required in order to successfully configure your single/multiple running instance of Rancher and that is for a simple reason. As far as i managed to test, no mount command is working of an external USB storage (please be aware that we are talking about an isolated environment)  and also copy/paste is not running by default without Virtualbox Guest Tools installed (unfortunately this is also not possible because we will not have a GUI and these kind of releases are not supported, i think this is also the case of CoreOs). Please make sure that the servers are reachable and have sshd installed and configured.

    Since Rancher is available only with ssh key login, because of security reasons, you will need to add it before install to the cloud-config.yml

    On the jump server you need to generate a rsa key with the ssh-keygen command and it will create in the .ssh directory the following pair of files (this is a list from my test machine) :

    -rw-r–r– 1 sorin sorin 394 Mar 21 08:09 id_rsa.pub
    -rw——- 1 sorin sorin 1675 Mar 21 08:09 id_rsa

    The next step is to build the minimal cloud-config file in order to get access to the machine, and in that purpose we can run the command

    echo -e “#cloud-confignssh_authorized_keys:n – $(cat id_rsa.pub)” > $HOME/cloud-config.yml

    This will create the only file you need in order to install your “server”.

    Ok, it’s time to start our Rancher machine, please make sure that you have the Rancher image mounted in order to boot it. After this process is done you will need to connect to the jump server in order to grab the file created above. Please do that with the following command:

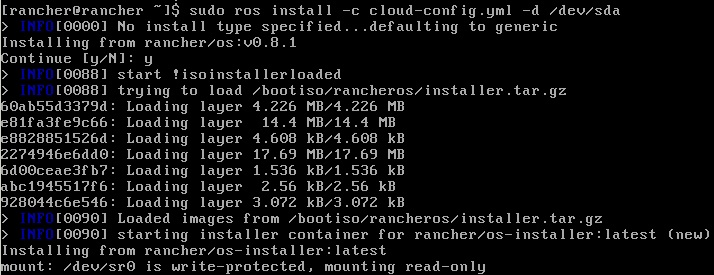
    After this is done, we can install it on the local drive. Since it’s more simple with a printscreen i will list another one 🙂

    Ok, this being done, you will be propted to restart the machine but before that please make sure that you have unmounted the rancher image from the virtual drive otherwise it will boot from it and not from the actual install.

    You are almost done, after restart you can access the server via ssh rancher@[rancher server ip] if you used the default id_rsa key from the .ssh directory, and if not, ssh -i [private key file location] rancher@[rancher server ip]

    More articles to come on this topic,

    Cheers!